How to check, understand, and improve your Fire TV WiFi Speed, Signal Strength, and Network Noise
Poor network quality and the issues that it causes, like buffering and degraded image quality/resolution, are the top complaints among Fire TV, Fire TV Stick, Fire TV Cube, and Fire TV Smart TV owners. That is likely why Amazon has revamped the Fire TV’s built-in network status testing utility with additional information and functionality to help Fire TV owners asses and fix network issues. This guide will help you understand the different values in the new network utility, such as signal strength, noise, and channel utilization, as well as suggest ways to improve each value.
Important: The updated network status test is not currently available on all Fire TV models. If your device is still using the , then you cannot follow this guide. You should check for updates to see if the new network utility is available for your device.
Open Network Status Test
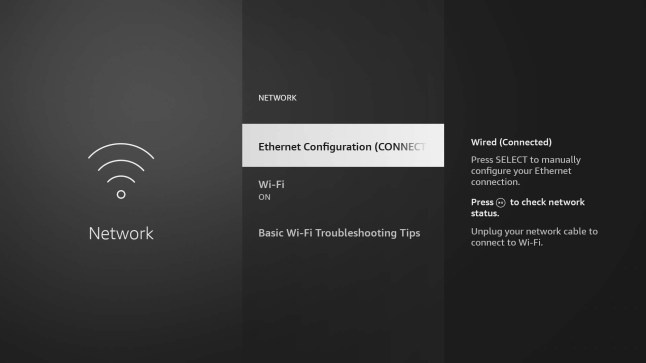
Alternatively, you can launch the network advisor by first navigating to the Fire TV’s settings screen, which can be accessed through the gear icon in the main navigation menu on the Home screen. Once in settings, select the Network menu. Once on the network screen, highlight your current WiFi or Ethernet connection and press the PLAY/PAUSE button on your Fire TV remote.
Check Internet Download Speed
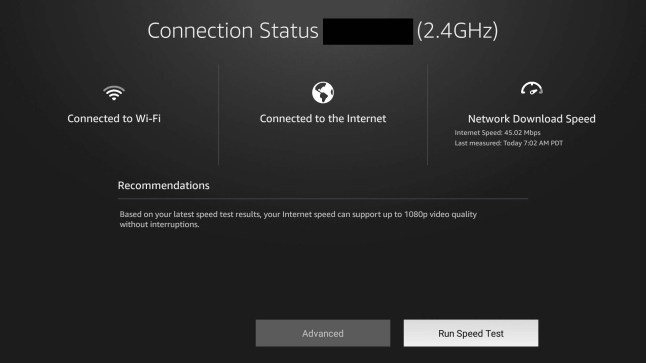
Once you’ve opened the Network Test mentioned above, select the Run Speed Test button in the bottom right. After a few seconds, you’ll see your device’s internet speed listed in the top right. The general rule of thumb is that you need a speed of at least 15 Mbps to stream 4K UHD 2160p video but 25 Mbps and high is prefered. To stream 1080p Full HD video you need speeds of at least 5 Mbps. For SD 480p (DVD quality) video streaming, which is generally the minimum need for most streaming services, you need speeds that are at least 3 Mbps.
Your Fire TV download speed will determine the quality of the video image being streamed, since most streaming services will degrade the video quality in order to avoid buffering.
Check Network Quality

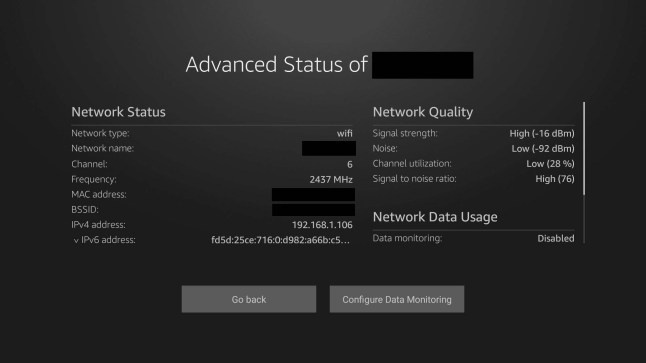
With the network status test screen open, select the Advanced button at the bottom of the screen to see your network quality metrics. You’ll find them in the top right of the advanced screen and they consist of signal strength, noise level, channel utilization, and the signal to noise ratio.
Signal Strength
Measurment: 0 to -100 dBm
Best: High is better (i.e., the less negative, the better)
Example: -16 dBm is better than -65 dBm
The signal strength, as the name describes, measures how strong the WiFi signal is between your Fire TV and your WiFi router. If this value is too low, you can try moving either your Fire TV or your router closer to each other. You can also try moving any large objects that are between the two devices. If you are using a Fire TV Stick, you should use the HDMI extension cable that came with your device because moving the firestick further away from the back of your TV will usually improve its signal strength.
Noise Level
Measurment: 0 to -100 dBm
Best: Lower is better
Example: -92 dBm is better than -25 dBm
The noise level is the amount of background noise on the same WiFi radio frequency as your Fire TV. You may not be able to improve this if the noise is coming from devices that you have no control over, like your neighbor’s electronics. You can try moving or turning off any electronic devices near your Fire TV to improve the level of noise. You can also try switching your Fire TV from using a 2.4 GHz WiFi network to a 5 GHz WiFi network, or vice versa, if your router and Fire TV model support both frequencies.
Channel Utilization
Measurment: 0% to 100%
Best: Lower is better
Example: 28% is better than 87%
The channel utilization value indicates how full the WiFi channel is that your Fire TV is currently connected to. If the channel is too full, performance can be negatively affected. If the current channel has a high utilization percentage, you should change the channel used by your WiFi router, which is done through the router’s settings. Once the channel is changed on your WiFi router, the Fire TV will automatically connect to the new channel, so there is nothing that needs to be changed on the Fire TV side. You just may just need to restart your Fire TV once for it to find the new channel.
Signal to Noise Ratio
Measurment: 0 to 100
Best: Higher is better
Example: 76 is better than 25
The signal to noise ratio is simply the difference between your signal strength and your noise level. So, having a signal strength of -16 and a noise level of -92 means you have a signal to noise ratio of 76 because 92 – 16 = 76. This value is important for WiFi performance because it indicates that even if you have great signal strength, you can still have poor performance if your noise level is too high. Generally, you want your signal to noise ratio to be 25 or higher. Dropping below 25 will likely result in poor performance, regardless of how strong your signal strength is. To improve this ratio, you simply need to improve either your signal strength, your noise level, or both as described above.
